3.7 Admins
The Admins section of the admin panel provides an overview and management interface for all staff members of your company — these are the individuals who can operate in the admin panel.
3.7.1 List of admins
Each entry in this list represents an admin registered in the admin panel. This section allows staff to view admin profiles, monitor their activity, manage authentication and permissions, and take necessary administrative actions.
3.7.1.1 Search & Filtering
- Column sorting: Small arrows to the right of the column name can be used to sort by the column content; pressing the icon again will sort in the opposite direction. There are different types of sorting for different columns:
- alphabetically (A–Z / Z–A) for text columns such as Email and Full name
- by date (from earliest to latest and back) for Created at and Last online
- by status order (Active → Blocked → Archived → Invited → Invitation expired, and reverse) for the Status column
- Column Filters: each table column supports its own filter or input field to narrow down results:
- Email – free text input for admins’ email addresses.
- Full name – free text input for admins’ full names.
- Status – dropdown filter for statuses like Active, Blocked, Archived, Invited, or Invitation expired.
- Created at – date range picker for filtering by creation date.
- Last online – date range picker for filtering by last online date.
3.7.1.2 Admin Data Table
Each row represents one staff member and includes the following columns:
| Column | Description |
|---|---|
| Admin’s registered email address. | |
| Full Name | First and last name entered when the admin account was created. |
| Status | Admin account status: Active, Blocked, Archived, Invited, or Invitation Expired. |
| Created At | Date and time the admin account was created. |
| Last online | Last time the admin logged into the admin panel. |
| Actions |
• Block / Unblock admin • Archive / Unarchive admin • Invite again / Cancel invitation (if applicable) |
At the bottom of the table:
- Rows per page selector – Adjusts how many entries are displayed (default is 10).
- Navigation controls – Allow browsing through multiple pages of activity history.
3.7.1.3 Admin Statuses and Actions
In the Tokenizer.Estate admin panel, each staff member has a status that reflects their current state and access level within the platform. There are five distinct user statuses:
1. Invited
Assigned automatically when a new admin is invited via the "Invite Admin" function in the admin panel.
- An invitation email is sent to the provided address, prompting the admin to set up their account.
- The admin has not yet accepted the invitation or created login credentials.
- Cannot log in or access the admin panel.
- Can be:
- Uninvited by the Cancel Invitation (from the list or detailed view).
2. Active
Indicates that the admin has accepted the invitation and successfully created their account.
- Has full or limited access to the admin panel, depending on their permissions (if applicable).
- Can manage users, settings, or content as allowed.
- Can be:
• Blocked (from the list or detailed view)
• Archived (from the list or detailed view)
3. Blocked
Admin access has been restricted manually by another admin.
- Cannot log in or perform any admin actions.
- Useful for temporarily suspending access without archiving the account.
- Can be:
• Unblocked (from the list or detailed view. Restores previous status)
• Archived (from the list or detailed view)
4. Archived
The admin has been archived in the system.
- Cannot log in.
- Can be unarchived.
5. Invitation Expired
The admin did not accept the invitation within the allowed time window.
- The setup link has expired and is no longer valid.
- The admin has not completed account creation.
- Cannot log in or access the admin panel.
- Can be:
• Resent invitation (from the list or detailed view, which generates a new link)
• Archived (from the list or detailed view)
These statuses ensure proper access control, visibility, and security in the admin management process. They help platform owners distinguish between invited, active, suspended, and removed staff members.
3.7.1.4 Elevate
The Elevate feature allows administrators to grant temporary elevated permissions to specific admin accounts, enabling them to perform actions beyond their default role for a limited time.
How It Works:
- Admins can click the Elevate button on another admin's profile to open a Grant Temporary Permission modal.
- In the modal, the granter selects:
- Permission — e.g., Edit Unit, Publish Smart Contract, Edit Token Price, etc.
- Expiration — e.g., 24 hours.
- Approver — the admin responsible for approving the elevation.
- Reason — a required field to justify the elevation request.
- There's also an Any checkbox to skip approver selection if universal approval is permitted by policy.
Once submitted and approved (if applicable), the target admin immediately receives the selected permission(s), which will automatically expire after the defined time period.
This feature supports granular access control and auditability, ensuring that sensitive operations (such as publishing smart contracts or editing compliance fields) are only available when truly necessary — and only to authorized personnel for a defined time window.
3.7.2 Create a new admin
Admins are typically invited to the platform by platform owners or other authorized admins.
To add a new admin:
- Go to the Admins section in the sidebar.
- Click the green Invite Admin button in the top right corner of the screen.
- Fill in the required fields:
- Email – the admin's login email
- Click Invite Admin. The invited admin will receive an email with their personal link. The link is active for 3 days. There is an opportunity to cancel the invitation or send a new one
Once created, the new admin will appear in the list with the Invited status and will be able to log into the admin panel using the link provided to their email.
Note: Admin accounts are sensitive — only authorized personnel should be granted access. It's recommended to use strong, unique passwords and enable 2FA where available.
Any time before the invited admin follows the invitation link, their invitation can be revoked using the Cancel Invitation button (from the list or detailed view). In that case, the link became inactive.
If the invited admin fails to follow the link while it's active, the link can be resent using the Invite again action on the list or the Resend Invitation button on the detailed view page.
3.7.3 Admin Detailed View
From the Admins section, click anywhere on an admin’s row in the table to open their full profile view. This includes (but is not limited to) clicking on the email — the entire row is interactive.
This detailed view helps manage each admin's account securely and with full visibility into their platform activity.
It is divided into three tabs:
- General – profile details, two-factor authentication (2FA), and permissions.
- Activity – history of admin actions performed across the platform.
- System Logs – technical logs related to this admin’s account activity.
This page can be accessed by clicking the admin’s name and email in the bottom-left corner of the sidebar, next to the logout icon.
It is designed to give admins full control over their account credentials and security without requiring help from other administrators.
3.7.3.1 General Tab
The General tab is the primary section where admins can view and update their account information, as well as manage assigned permissions.
1. Profile Details
This section displays the core information about the selected admin account:
| Column | Description |
|---|---|
| ID | Unique system identifier for the admin. |
| Status | shows whether the account is Active or Blocked. |
| 2FA | shows whether 2FA is enabled or disabled. |
| Timezone | the configured time zone for this admin. |
| Creation time | the exact date and time the admin account was created. |
| Last online | timestamp of the most recent login. |
| the admin’s registered email address. |
Below the profile details, admins with sufficient permissions can update account information:
- Change profile details — fields to edit email (read-only if restricted), first name, last name, timezone, and phone number.
- Save Changes button — saves updates to profile details.
2. Permissions Panel
The Permissions panel allows fine-grained control over what the selected admin can access or perform within the platform. Permissions are grouped by domain:
- Units – admins with enabled permissions from this group can perform actions with property units in the admin panel.
After you have chosen all the needed permissions, press Save Changes at the bottom of the block.
- The top line allows the admin to alter whether the admin sees the section of the admin panel at all (view) and whether they can create, publish, or archive a new unit.
- Update base info — this permission allows an administrator to update a unit’s general information.
- Update financials – if enabled, the admin will be able to edit data in the Financials and/or Documents tab of the Unit.
- Update token price – if enabled, the admin will be able to edit the token price (Property Token Price field on the General tab).
- Update documents – if enabled, the admin will be able to edit data in the Financials and/or Documents tab of the Unit.
- Update accepted currencies – if enabled, the admin will be able to edit the currencies (choose USDT and/or USDC) in the Blockchain block in the General tab of the Unit.
- View receiving wallet – if enabled, the admin will be able to view the receiving wallet on the General tab of the Unit in the Blockchain section. The receiving wallet is the wallet to which funds are sent from investors for purchasing the tokens. This wallet can be defined after publishing the Smart contract.
- Update receiving wallet – if enabled, the admin will be able to edit the receiving wallet on the General tab of the Unit in the Blockchain section.
- View blockchain — this permission allows an administrator to interact with a unit’s smart contract via the built-in Web3 functionality.
- Deploy Contract – if enabled, the admin will be able to deploy a Smart Contract for the unit. Publishing a Smart Contract does not mean that the unit is published; it means that the token supply for the property is officially created on-chain. A unit can be published even without a Smart Contract.
- Users — admins with enabled permissions from this group can perform actions with the users of the investor backoffice through the interface of the admin panel.
- The top line allows to alter whether the admin sees the section of the admin panel at all (view), whether they can create a new user, update existing ones, or archive them.
- View personal details – if enabled, the admin will be able to see information on the General tab in the User detailed view.
- Block user – if enabled, the admin will be able to suspend the user from the investor backoffice.
- User verification – if enabled, the admin will be able to manage users' verification, manually verify them, or revoke verification.
- Admins – admins with enabled permissions from this group can perform actions with other admins.
- The top line allows to alter whether the admin sees the section of the admin panel at all (view), whether they can invite a new admin and revoke their invitations (invitation), or archive existing ones.
- View/Update permissions – if enabled, the admin will be able to view and/or alter other admins' (excluding themselves) permissions, managing their access to the admin panel.
- Elevate permissions — this permission allows an administrator to grant temporary permissions to another administrator.
- Block – if enabled, the admin will be able to suspend other admins (excluding themselves) from the admin panel.
- Authorizations – admins with enabled permissions from this group can view or approve/disapprove (update) requests for temporary permissions for admins.
- API Keys — admins with enabled permissions from this group can manage API access keys.
- View — this permission allows an admin to access the API Keys section, where information about created access keys is displayed.
- Create — this permission allows an admin to generate a new API key.
- Revoke — this permission allows an admin to revoke an existing API key.
- Logs — admins with enabled permissions from this group can view Client or System logs.
- IP Whitelist — admins with enabled permissions from this group can manage platform access rules based on IP addresses.
- View — if enabled, the admin can access the IP Whitelist section and view information about existing platform access rules for specific IPs.
- Create — if enabled, the admin can add a new IP access rule for administrators.
- Revoke — this permission allows an admin to revoke an existing IP rule.
- Compliance — admins with enabled permissions from this group can access and manage compliance-related reports in the admin panel.
- View — if enabled, the admin has access to the Compliance section, which contains reports generated based on platform data (users, units, etc.).
- Update — if enabled, the admin can edit data in the Compliance section to keep reports up to date.
- View appropriateness tests — if enabled, the admin can view appropriateness tests.
- Update appropriateness tests — if enabled, the admin can update appropriateness tests.
- Create appropriateness tests — if enabled, the admin can create appropriateness tests.
- Transactions – since transactions happen not inside of the Tokenizer.Estate platform, but on the blockchain, they cannot be either edited or deleted. Therefore, there is only one action that can potentially be performed with them: transactions can be viewed.
- Notifications — admins with enabled permissions from this group can manage platform notifications.
- View — This permission grants the administrator access to the Notifications section, which lists all notifications created/generated on the platform and sent to users.
- Create — This permission allows the administrator to create a notification and send it to all platform users, a specific user, or token holders of a selected unit.
- Tickets — admins with enabled permissions from this group can work with user support tickets.
- View — opens access to the Tickets section, where information about all platform users’ requests is displayed.
- Update — allows the admin to work with a ticket by communicating with the platform user via chat.
- Content – admins with enabled permissions from this group can update the investor backoffice's content or documents.
- Settings – in this group, there is only one permission, indicating whether the admin can update the referral program.
At the top of the Permissions panel, you can:
- Create a new role — define a custom role template by grouping permissions.
- Apply a saved template — load predefined permission sets.
- Enable All / Disable All — quickly toggle entire groups of permissions.
- Save Template — store the current set of permissions as a reusable template.
The General tab, therefore, combines profile management with role-based access control, giving administrators flexibility while maintaining security and accountability.
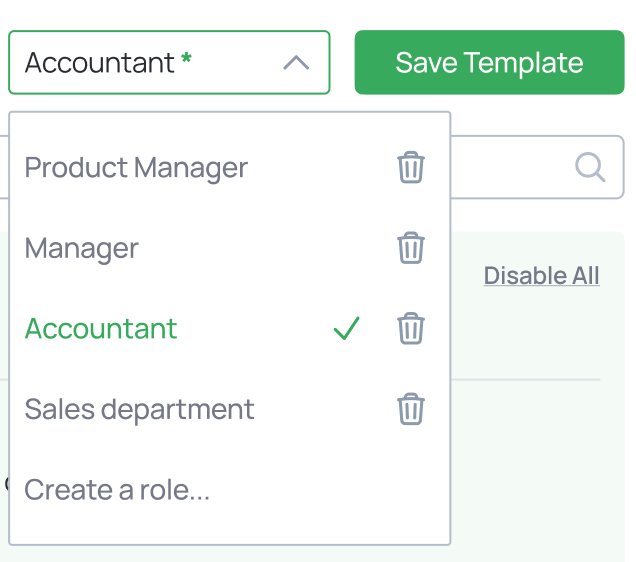
3.7.3.2 Creating Permissions Presets (Roles)
At the top of the permissions block, you can see the dropdown list with a Save Template button on the right. This is an instrument to create Permissions Presets to apply them to other admins.
Example:
You have created an admin with a set of permissions for finance duties. You then need to create accounts for other employees with similar permissions. In order not to populate the same checkboxes many times, you can:
- Create a new role by choosing the corresponding variant from the dropdown list, entering its name, and pressing the Save Template button. Note that the role will be created immediately with the set of permissions that are already assigned to this admin, so you need to first assign all permissions, then create a new role.
- To assign the set of permissions from an already created role, just choose the role from the dropdown list. Note that if you haven't saved your previous set of permissions, it will be lost, and you will need to manually restore it.
- If you have assigned the set of permissions, but made some changes to the set, the admin panel will show the "*" green sign to the right of the role's name, meaning that you can press "Save" to save changes to this role.
- Roles can be deleted by pressing the "Trash can" icon in the dropdown list.
- You can just set the permissions without creating roles at all – this is an optional functionality. By default, admins do not have roles.
3.7.3.3 Activity Tab
The Activity tab provides a detailed audit trail of all actions performed by the selected admin account. It allows administrators to review past activities, track permission changes, and verify account usage for compliance and security purposes.
The Activity tab is structured as a searchable and filterable table with the following elements:
- Column sorting: Small arrows to the right of the column name can be used to sort by the column content; pressing the icon again will sort in the opposite direction. There are different types of sorting for different columns:
- alphabetically (A–Z / Z–A) for text columns such as User and Admin
- by date (from earliest to latest and back) for Time
- by action (Ticket Under Review → Admin Blocked → Admin Unblocked → Admin Profile Updated and vice versa)
- Column Filters: Each table column supports its own filter or input field to narrow down results:
- ID – free text input for a unique system identifier of the activity.
- Time – date range picker to display activities only within that period.
- Action – dropdown filter for type of action (e.g., Permissions Update).
- Type – dropdown filter to choose the type of action (Regular, Alert, System).
- Unit – free text input for specific real estate units' names.
- User – free text input for a user's Full name, Email, or ID (depending on the admin's permissions).
- Admin – free text input for an admin's Full name, Email, or ID (depending on the admin's permissions).
- IP Address – free text input for IP address.
- Info (Text Filter) – free text input for searching across additional details included in activity metadata.
Each row in the activity log includes:
| Column | Description |
|---|---|
| ID | Unique system identifier for the activity. |
| Time | Exact timestamp (UTC) when the action occurred. |
| Action | Name of action performed (e.g., Permissions Update). |
| Type | Type of action performed (e.g., Regular, Alert, System). |
| Unit | Shows the associated unit if the action was linked to a specific property or project. |
| User | Indicates which platform user (if any) was affected by the action. |
| Admin | Identifies the admin who performed the action (may display “-” if unavailable). |
| IP Address | The origin IP of the request or login attempt. |
| Info |
A collapsible JSON-style data field with additional details (such as
adminId,
modified permissions, or related identifiers).
|
At the bottom of the table:
- Rows per page selector – Adjusts how many entries are displayed (default is 10).
- Navigation controls – Allow browsing through multiple pages of activity history.
This tab is helpful when you need to perform:
- Security review – Verify login IPs to detect unusual access.
- Permission tracking – Monitor changes in admin roles or rights.
- Audit compliance – Provide a record of all administrative actions for regulatory or internal auditing.
3.7.3.4 System Logs Tab
The System Logs tab provides a transparent and auditable record of all system-level activities associated with a specific admin account. This view is crucial for monitoring security events, compliance tracking, and internal investigations. It ensures administrators can review when and how an account has interacted with the system at a deeper level than just profile or permission changes.
The System log tab is structured as a searchable and filterable table with the following elements:
- Column sorting: Small arrows to the right of the column name can be used to sort by the column content; pressing the icon again will sort in the opposite direction. There are different types of sorting for different columns:
- alphabetically (A–Z / Z–A) for text columns such as Performed by
- by date (from earliest to latest and back) for Time
- by action (Admin Authorized → Admin Authorization Failed → Admin Profile Updated and vice versa)
- Column Filters: Each table column supports its own filter or input field to narrow down results:
- ID– free text input for log identifier.
- Time – date range picker to display activities only within that period.
- Performed by – free text input for an admin's Full name, Email, or ID (depending on the admin's permissions) who triggered this action.
- Action – dropdown filter for type of action (e.g., Permissions Update).
- Type – dropdown filter to choose the type of action (Regular, Alert, System).
- IP Address – free text input for IP address.
- Info (Text Filter) – free text input for searching across additional details included in activity metadata.
Each row in the activity log includes:
| Column | Description |
|---|---|
| ID | Unique system log identifier. |
| Time | Exact timestamp (UTC) when the action occurred. |
| Performed by | Indicates the admin or system entity who initiated the action. |
| Action | Name of action performed (e.g., Permissions Update). |
| Type | Type of action performed (e.g., Regular, Alert, System). |
| IP Address | The origin IP of the request or login attempt. |
| Info | A collapsible JSON-style data field with additional details (such as adminId, modified permissions, or related identifiers). |
At the bottom of the table:
- Rows per page selector – Adjusts how many entries are displayed (default is 10).
- Navigation controls – Allow browsing through multiple pages of activity history.
This tab is helpful when you need to perform:
- Security Monitoring
Track suspicious activities (e.g., repeated IP changes, unauthorized access attempts). - Compliance & Audit
Maintain evidence of role elevation, permission updates, and sensitive actions for audit trails. - Account Investigation
Identify when access was granted, modified, or revoked, ensuring accountability across admin accounts.